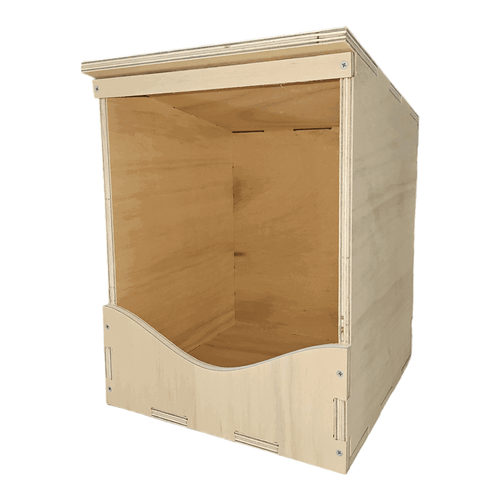
Single Chicken Nesting Box - Dine-A-Chook

- Aussie Made: Crafted from durable 12mm plywood.
- Easy DIY Assembly: Unique "Dog Bones" system for quick setup.
- Sloped Roof & Curtain Option: Keeps coop clean and adds privacy.
- Weather-Ready: Suitable for painting to withstand weather conditions.
- Pickup at Dine-A-Chook Warehouse: Free.
- Regular Post (Under 500g): $9.95.
- Express Post (Under 500g): $13.95.
- Standard Shipping (500g–20kg): Flat rate of $15.95.
- Express Post (Over 500g): From $18.95 based on weight.
- Express + Insurance: From $19.95 based on weight.
- Free Standard Shipping: For orders over $299.
*These shipping rates apply to Australian orders only. International shipping rates will be calculated at checkout and may differ.*
Single Hole Dine-A-Chook Flat Pack Nesting Box
Discover Australian Craftsmanship
Introducing the Dine-A-Chook Flat Pack Chicken Nesting Box, expertly designed for the Aussie backyard. Made with 12mm Hardwood Exterior Plywood, this box is a durable sanctuary for your hens. It supports Australian manufacturing with materials cut using an Australian-made Multicam CNC Router.
DIY Made Easy
Assembly is a breeze with our unique "Dog Bones" method. With screws, instructions, and minimal tools required, setting up your Hen Laying Box is straightforward, making it the perfect weekend project.
Innovative Features
The box measures 402mm in height, 300mm in width, and 309mm in depth. It features a sloped roof to deter perching and an optional Nesting Curtain for extra privacy (sold separately). Designed for easy egg collection and to maintain cleanliness, it's a must-have for any chicken keeper.
Weather-Ready
Though naturally beautiful, we recommend painting the Nesting Box with exterior-grade paint for weather exposure, ensuring it remains a secure and comfortable haven for years.
Transform your poultry care with the Flat Pack Chicken Nesting Box from Dine-A-Chook. It's more than a Nesting Box; it's a commitment to quality and Australian ingenuity.
Aussie Hen Haven Assembly Instructions
Nesting Box Assembly Instructions
Tools Required: A rubber or nylon mallet is needed. If using a regular hammer, proceed cautiously to avoid damaging the parts.
Step 1: Preparation
Begin by laying out all parts on a flat surface. You should have seven pieces in total, along with a bag containing 24 screws.

Step 2: Front Piece Assembly
Align the front piece with the base, ensuring the countersink holes face outward for a neat finish. Gently tap into place using a mallet.

Step 3: Sides Assembly
Attach the side pieces without forcing them. If you are having to force the parts together, stop, realign, and gently tap the pieces together. Start with the right side as shown.

Once the right side is in place, follow the same steps for the left side.

Step 4: Back and Top Attachment
Now, attach the back piece first, followed by securing the top piece in place.

Step 5: Curtain Support
Attach the curtain support at the front, ensuring it's properly aligned.

Step 6: Final Assembly
Use the provided screws and your cordless drill or screwdriver to secure everything together. For longevity and protection, painting with a quality exterior grade paint is recommended, especially focusing on the joins to prevent bug infestations.
Shipping Policy
Dine A Chook offers a range of shipping options to suit your needs. Please review our policies below:
Shipping Rates (Australia)
- Under 500g: $13.95 flat rate.
- 500g–20kg: $15.95 flat rate.
- Over 20kg: Handled via StarTrack freight services. Shipping costs are quoted separately based on weight, size, and destination.
- Express Shipping: Calculated at checkout (from $14.95).
- Click & Collect (Garbutt): Free for eligible postcodes.
- International Orders: Calculated at checkout based on weight.
Orders Over 20kg
For orders exceeding 20kg, we use StarTrack freight services. Shipping costs vary depending on the parcel's weight, size, and destination. During checkout, the "Contact for Quote" option will display as $0.00; however, this does not mean free shipping.
Please Note:
- You will be contacted after placing your order with a custom shipping quote.
- Your order will not be processed until you confirm and pay the quoted shipping cost.
- If you have any questions about large orders or shipping costs, please contact us before placing your order.
Pickup Only Items
Certain items, such as 20kg bags of feed, are available for pickup only from our Townsville HQ at:
Dine A Chook HQ
16 Camuglia Street, Garbutt, Townsville QLD
Please select the "Click & Collect" option at checkout if purchasing pickup-only items. These items cannot be shipped under any circumstances.
How is Your Order Shipped?
All Dine A Chook orders are sent using Australia Post unless otherwise stated. Standard shipping includes tracking, and all orders require a signature upon delivery unless you provide an authority to leave. We deliver to:
- Residential and business addresses
- PO Boxes
- Parcel Lockers
Shipping Times
| State | Estimated Delivery (Business Days) |
| Queensland | 2–3 days |
| New South Wales | 3–5 days |
| Victoria | 5–7 days |
| South Australia, Tasmania & ACT | 6–8 days |
| Western Australia & Northern Territory | 8–12 days |
*With the exception of busy periods, orders received before 11am are generally shipped the same day.*
Need Assistance?
If you have any questions about our shipping policies or need assistance with an order, please don’t hesitate to contact us. We’re here to help make your shopping experience as smooth as possible!


