Dine-A-Chook Drinker Outlets - Installation and Use
Most Dine-A-Chook Drinker Outlets come pre-assembled. All you have to do is add the Lubing Drinker Cups.
Avoid unnecessarily disassembling Drinker Outlets. Follow the instructions below if disassembly is necessarily.
Contents
Click to jump directly to the section you need:
1. Drinker Outlet Assembly and Installation
2. Drinker Outlet Maintenance and Use
1. Drinker Outlet Assembly and Installation
Please note the following:
- Do not unnecessarily disassemble Drinker Outlets.
- While our Drinker Outlets perform perfectly in Dine-A-Chook Drinkers, this is the result of precision engineering and years of extensive testing. We cannot guarantee that a DIY Drinker will achieve the same reliability, even with a Dine-A-Chook Drinker Outlet.
- Drinker Outlets are only suitable for low-pressure systems. Head height should not exceed 35 cm. A header tank is required for all automatic watering systems.
- Failure to follow these instructions may void the product warranty.
Drinker Outlet Assembly and Installation Instructions
- Change over the Lubing Drinker Cup floats (Drinker Cup models only)
- Assemble the Drinker Outlet, if required
- Install the Drinker Outlet
- Connect the Lubing Drinker Cups (Drinker Cup models only)
1. Change over the Lubing Drinker Cup floats
If you have chosen a Nipple Drinker Outlet, proceed to Step 2. If you have chosen a Drinker Cup Outlet, read this section carefully.
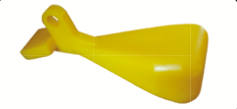
The additional floats provided with your Lubing Drinker Cups are not spares. For most chicken keepers, we recommend changing the Lubing Cup floats over prior to use.

The original Lubing Cup floats work perfectly well for chickens and poultry. However, they are designed to only allow a little water in the Lubing Cup. This doesn't affect how your chickens drink and the original floats do not have to be changed. However, most backyard poultry keepers prefer higher water levels in the Drinker Cup. This can be achieved by changing the Lubing Drinker Cup floats over to the complimentary Dine-A-Chook floats provided with your purchase.
To change your Lubing Drinker Cup floats:
- Use pliers to gently grasp the pin at the side of the Drinker Cup
- Remove the pin halfway and the float will fall out
- Leave the pin half way
- Hold the desired float in place
- Gently push the pin back into its original position to secure the float

2. Assemble the Drinker Outlet frame
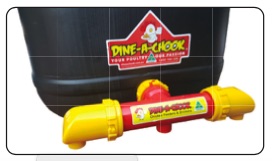
Most Drinker Outlets come preassembled and ready to connect to the water reservoir, as pictured below. Lubing Drinker Cups should be screwed into the Drinker Outlet after it is in place and has been installed/connected to the water source.

Ensure the Drinker Outlet is complete, minus the Drinker Cups (if using), and screw any extensions into place.
Do not unnecessarily disassemble Outlets and Outlet Frames. The water-tight connection on our Outlets is formed by an o-ring and a food-grade lubricant. Disassembling Outlets unnecessarily can compromise this seal.
Should disassembly be required, particularly after use, fittings will be difficult to separate. Handle gently.
To reassemble, spray fittings with olive oil before reconnection.
3. Install the Drinker Outlet frame
The specially designed square-face rubber o-ring will form a water-tight seal against any flat, rigid surface. Drinker Outlets connect to:
- 3/4 inch bung outlets
- 3/4 inch female BSP PVC pipe fittings
- 3/4 inch female BSP rural poly pipe fittings
- Suitable copper or brass pipe fittings.

These Drinker Outlets should never be connected directly to the water supply, whether it is mains water, a pump or gravity feed. A header tank or other suitable water reservoir should always be used.
Recommended reservoirs and header tanks include:
- 5, 10 or 20 L Drums
- Lubing Header Tanks
Drinker Outlets are made for low-pressure systems. Head pressure should not exceed 35 cm.
To measure head pressure, measure the distance from the Drinker Cup or Nipple to the highest point of the water reservoir. This distance should not exceed 35 cm. If the distance does exceed 35 cm, the Drinker Outlet is likely to leak or otherwise malfunction and an alternative reservoir is recommended.
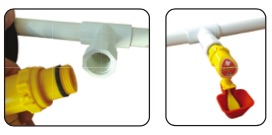
To install the Drinker Outlet, screw firmly into place but do not over tighten. If the fitting is loose or leaky, use white Teflon plumbers tape. Always ensure the square o-ring is in place prior to installing, as pictured below.

Once in place, position the Drinker Outlet correctly, i.e. the right way up and level. Push inwards while applying firm pressure and continue to tighten until the Outlet is correctly positioned.

4. Connect the Lubing Drinker Cups to the Outlet frame
Once the Drinker Outlet frame is in place, connect the Lubing Cups.
Place an o-ring onto the thread at the top of each cup.
Screw Cups firmly into place. Do not over tighten.

Nipple outlets will already be in place.
For more information, including Lubing Cup maintenance, visit our Lubing Cup Instructions page.
2. Drinker Outlet Maintenance and Use
Dine-A-Chook Drinker Outlets will provide years of reliable service. Simply clean with a damp cloth as needed.
Only disassemble if necessary. Spray lightly with olive oil prior to reassembly. While it is unlikely that seals will degrade, replace if wear and tear is noticeable.
Most Drinker Outlet problems are caused by dirty Lubing Cups. We strongly recommended cleaning Lubing Cups every 2-3 months, as per these instructions, and using a clean source of water free from minerals and sediment. Troubleshooting for Lubing Cup problems such as drips or dry Lubing Cups can be found here.
Colour fading may occur over time.
If you have any concerns about a Drinker Outlet, please contact us directly.

